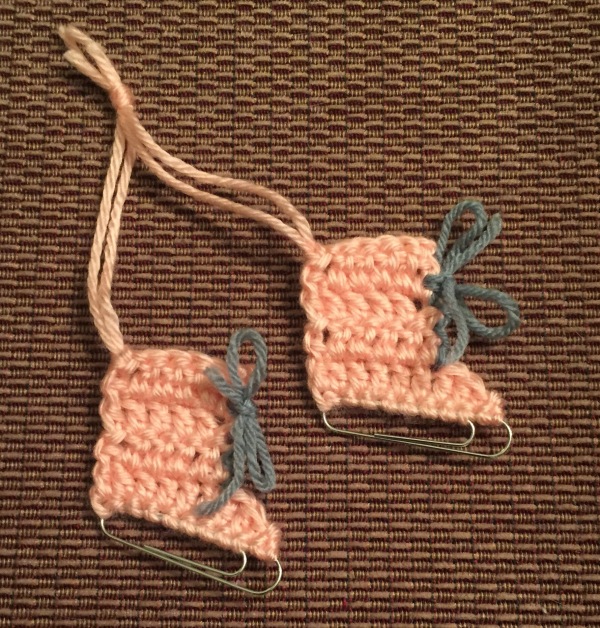
Crochet Ice Skate Ornaments

As mentioned in my previous post, I gave Christmas gifts to my department this year, and these handmade ornaments were the easy part. My grandmother made a few for each of her children many years ago, and I snagged one from my parents house and did my best to duplicate what she did.

Tools:
2 jumbo paper clips
2 colors of contrasting yarn
F hook

Instructions:

Row 1: Starting with whatever color you’ve chosen as the main skate color, make 10 sc in the top of the paper clip (I found that 8 sc in the bigger section and 2 sc at the end worked best for me).
Row 2: Don’t make a chain here! Skip the first sc, sc in the next st, hdc in the following st, and then dc to the end of the row (you will have a total of 1 sc, 1 hdc, and 7 dc).
Row 3: Ch 2 (counts as first dc), dc to end.
Rows 4-6: Repeat row 3.
Fasten off, then repeat for the second skate.

For the yarn with which you will hang them, I cut 2 lengths of yarn a little more than  twice as long as I wanted them to hang. Take one, fold it in half, and thread the loop through a corner of the skate (either will do, as long as you do the same corner for both skates). Then, take the length and pull it through the loop you just made to attach it. Repeat for both skates, then tie the loose ends together.

With the contrasting color, weave the laces – I cut off 10-12 inches to do this (I learned my lesson quickly; tying knots with tiny bits of yarn is super difficult). It’s difficult to explain this process in words, so hopefully the photos below will help illustrate. (It isn’t unlike lacing a regular shoe…if you didn’t have lace holes, at least.)

/home/wpcom/public_html/wp-content/blogs.dir/773/15438368/files/2015/01/img_6979.jpg

I’m pretty pleased with how they turned out! It’s a pretty easy and quick project, so it’s great for group gifts, like these.

/home/wpcom/public_html/wp-content/blogs.dir/773/15438368/files/2015/01/img_6981.jpg

/home/wpcom/public_html/wp-content/blogs.dir/773/15438368/files/2015/01/img_6982.jpg

/home/wpcom/public_html/wp-content/blogs.dir/773/15438368/files/2015/01/img_6984.jpg

Cookie Mix In A Jar, Disaster In My Kitchen

In the last year since I’ve updated this blog (whoops), I got a new amazing job for an amazing company in an amazing department with amazing people. (Did I mention my work life is great?) I only started in January 2014, so this is my first Christmas season with everyone, and I didn’t even think about gifts for everyone in my department…of 9 other people. That’s a lot of thinking, and I can barely buy gifts for my husband who I’ve known for 10 years. So, I started looking for ideas online, and realized I could finally try something I’ve been wanting to try for a while but never had the occassion – the (in)famous cookie mix in a jar.

Image from The Creative Junkie

I’m sure you’ve seen these all over the internet, especially if you’re on Pinterest (I’m a recovering Pinterest addict myself). They look super cute and are great and inexpensive gift ideas, perfect if you work in a department with 9 other people. Plus, it’s literally dumping ingredients in a jar. How hard could it possibly be? (hahahahahahaha.)

I looked around and decided on following these instructions from AllRecipes. I got 9 1-qt mason jars from Michael’s for $2.49 each, and decided I would use a few sheets of Christmas craft paper I already had to cut into tags, and print out the instructions on pieces of paper and just glue them to the festive paper. (On an unrelated note, I also decided I would crochet small ornaments to go with these, which I will discuss further in another post.)

Since I purchased the jars on a Friday night, and wanted these prepared to bring to work the following Tuesday, Saturday morning seemed like a good time to have a test run, since I had absolutely no plans on Sunday. I knew we didn’t have enough of everything for 9 batches, so I went to the supermarket before 9am to grab extra of everything. (Did I mention this was all happening the weekend before Christmas? I have been a master procrastinator since I was 7 years old.) I got home and reviewed the instructions; in hindsight, I should have seen a red flag at “1 1/2 c of flour,” but whatever it’d be fine.

/home/wpcom/public_html/wp-content/blogs.dir/773/15438368/files/2014/12/img_6961.jpg

Not so much.

This would be perfect if I didn’t still have to add a cup of chocolate chips! Guess who started baking cookies at 9:30 in the morning, with the organic butter I’d just paid a ridiculous amount for, since we had no regular sticks of butter.

I read through some of the comments on AllRecipes and was stunned that there was only one negative comment about actually fitting the ingredients. Everyone else claimed they packed and packed and packed with an ice cream scoop until it all fit nicely, but I didn’t have the time or patience for that. (Well, I had the time, but didn’t want to have an issue AGAIN, because now I definitely didn’t have enough butter for another batch.) So I figured I could just halve the recipe, and add 2 each of the cookies I’d just surprise-baked, since now I’d have room at the top of each jar. Except…

/home/wpcom/public_html/wp-content/blogs.dir/773/15438368/files/2014/12/img_6963.jpg

Nice try.

/home/wpcom/public_html/wp-content/blogs.dir/773/15438368/files/2014/12/img_6964.jpg

These things spread to be HUGE. I will take some of the blame for this, because the recipe called for softened butter, and I stopped paying attention and half of my butter was melted. But really? There is no way I’m fitting these things in the mason jars.

Now, it’s not even 11am and I’m drinking white wine because this whole experience has me strung out. Plus now I have to wash all the dishes from my surprise baking session. At this point, I’ve already rinsed out the Fail Jar, so I refilled it but with half of all the ingredients.

/home/wpcom/public_html/wp-content/blogs.dir/773/15438368/files/2014/12/img_6965.jpg

A definite improvement, since now everything actually fits, but there is so much OBVIOUS empty space at the top, now I have to think of something else to fill it with. (Oh, and of course, this new job is for one of the biggest candy companies in the world, so putting some candy in a plastic bag and placing it on top would be pointless.) I toyed with the idea of literally dumping packets of hot chocolate into plastic bags, but then decided I would just cut the cookies up until they fit. (Cookie bites are a thing, right?)

/home/wpcom/public_html/wp-content/blogs.dir/773/15438368/files/2014/12/img_6986.jpg

/home/wpcom/public_html/wp-content/blogs.dir/773/15438368/files/2014/12/img_6984.jpg

The cookies were a huge hit, and everyone was appreciative. And maybe if I hadn’t done this less than a week before Christmas, it wouldn’t have seemed quite as tragic. But I’ve learned my lesson – if I ever want to attempt the cookie mix in a jar gift again, I’ll just make the cookies.

Santa Hat Pattern

My sister-in-law asked me if I could create a Santa inspired hat (initially for New York SantaCon). She texted me a photo for inspiration, and I came up with this:

Sorry everyone, I’m not single.

I even remembered to write down the pattern!

Hat

Create a magic ring.
Round 1: Chain 3 (counts as first dc here and throughout; the first dc in each round should be a ch3!), 9 dc (10 dc)
Round 2: 2 dc in each dc (20 dc)
Round 3: *2dc in first dc, 1 dc in next dc* repeat from * to * until end (30 dc)
Round 4: *2 dc in first dc, 1 dc each in next 2 dc* repeat from * to * until end (40 dc)
Round 5: *2 dc in first dc, 1 dc each in next 3 dc* repeat from * to * until end (50 dc)
Rounds 6-12: 1 dc in each dc (50 dc)

Do not bind off after round 12!

Earflaps

Row 1: Turn, ch3 (does not count as first dc, here and throughout earflap), dc 7, turn
Row 2: ch3, dc 7, turn
Row 3: ch3, dc2tog, dc3, dc2tog, turn
Row 4: ch3, dc2tog, dc1, dc2tog, turn
Row 5: 
ch3, dc3, bind off

Count 20. join at 21st and repeat earflap pattern. (I would do row 1 of the second earflap, and then make sure it lines up to your own ears. This is what worked for me!)

Belt

**For this, I just worked the first row of sc in the 10th row of the hat. Since you’re working sc over dc (worked in the round, no less, so I had to mess around with stitch placement to get them to line up), I wouldn’t suggest this method. I mean, it looks fine, but it’ll be much easier to sc a black strip, and just whipstitch or sew it to attach. So, I will give the instructions for a black band.

Chain 51, turn
Row 1: sc in 2nd ch from hook, sc to end, ch1, turn (50sc)
Row 2: sc in each sc, ch1, turn (50sc)
Repeat row 2 three more times. Attach around hat (mine wound up spanning rows 8-10 of the hat)

Buckle

All you have to do here is surface slip stitch in a vaguely squareish/rectangular shape. Just make sure the top and bottom parts of the buckle are on the red part of the hat, and that the buckle is centered in the front of your head. My buckle was 5 stitches on the top and bottom, and 6 stitches on each side.

Here is a video on how to surface slip stitch: slip stitch surface: http://youtu.be/EJ8FI5PJfvk

Edging

With a fur yarn (I don’t know of any other than Lion Brand Fun Fur), sc all round the hat.

Pom Pom

I used the wrap method, and used width of DVD case and wrapped ~60-70 times. This turned out WAY TOO BIG and lead to 45 minutes of trimming and 15 minutes of vacuuming all the bits. I attached it  just by tying a knot on inside of hat.

This project on Ravelry

Homemade Peppermint Marshmallows

I like to live life frugally. So every Christmas I usually wind up making many of the gifts I give to people; either something entirely handmade or, more often, something handmade to go along with what I’ve already purchased. More than being frugal, however, I feel like handmade is far more heartfelt. A lot of people don’t realize the time and effort it takes to make gifts and think it’s merely a way to cop out of spending money, which makes me sad. When I crochet even just a hat, it takes hours of my time, and that ought to be worth more than any money I were to drop on something found in a store.

Now that I’ve had my rant, the point was that I got my cousin a mug for Christmas from Ghost Adventures on Travel Channel (which is one of the best reality shows next to Ancient Aliens) and found a neat post on Pinterest on a layered hot chocolate recipe – perfect! The recipe called for crushed peppermint starlights/candy canes, but thanks to another post from Pinterest, I decided to omit that part and replace it with homemade peppermint marshmallows from the Betty Crocker website.

Ingredients

  • Butter for greasing – I just sprayed my Pyrex with cooking spray
  • 1/3 cup powdered sugar
  • 2 1/2 tablespoons unflavored gelatin
  • 1/2 cup cold water
  • 1 1/2 cups granulated sugar
  • 1 cup corn syrup – MAKE SURE YOU HAVE THIS AND DON’T TRY TO SUBSTITUTE IT. More on that later.
  • 1/4 teaspoon salt
  • 1/2 cup water
  • 1 teaspoon pure peppermint extract – I used imitation peppermint extract because that’s what Shop Rite had, and it was fine
  • 8 to 10 drops red food color – I think I wound up using like, fifteen
  1. Generously grease bottom and sides of 11×7-inch (2-quart) glass baking dish with butter; dust with 1 tablespoon of the powdered sugar. In bowl of stand mixer, sprinkle gelatin over 1/2 cup cold water to soften; set aside.
  2. In 2-quart saucepan, heat granulated sugar, corn syrup, salt and 1/2 cup water over low heat, stirring constantly, until sugar is dissolved. Heat to boiling; cook without stirring about 30 minutes to 240°F on candy thermometer or until small amount of mixture dropped into cup of very cold water forms a ball that holds its shape but is pliable; remove from heat. I don’t have a candy thermometer, nor do I have the patience to check the temperature the way it is listed, so after bringing it to a boil I lowered the temperature and just let it do its thing for 30 minutes.
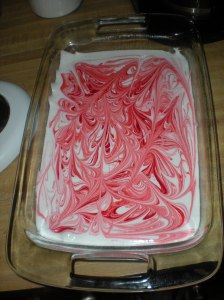
  3. Slowly pour syrup into softened gelatin while beating on low speed. Increase speed to high; beat 8 to 10 minutes or until mixture is white and has almost tripled in volume. Add peppermint extract; beat on high speed 1 minute. Pour into baking dish, patting lightly with wet hands. Drop food color randomly onto top of marshmallow mixture. Pull table knife through food color to create swirl pattern over top. Let stand uncovered at least 8 hours or overnight.
  4. 001

  5. Dust cutting board with about 1 tablespoon powdered sugar. Place remaining powdered sugar in small bowl. To remove marshmallow mixture, loosen sides from dish and gently lift in one piece onto cutting board. Using sharp knife greased with butter, cut into 1-inch squares (11 rows by 7 rows). Dust bottom and sides of each marshmallow by dipping into bowl of powdered sugar. Store in airtight container at room temperature up to 3 weeks.

In regards to my note about the corn syrup, I didn’t realize until I had already put the gelatin and water in my mixer that I had none, so I looked up a substitute online because I actually do that quite a bit with ingredients I don’t normally keep in the house. Well, the substitute for corn syrup is water and sugar. When you try to mix that with MORE water and sugar, disaster strikes. And by disaster I mean after almost an hour your sugar will still have not dissolved. I had to admit defeat and put the gelatin & water mix in the refrigerator overnight; after coming back home with the corn syrup everything went fine.

010

008

I’m still trying to get through all the marshmallows. I’m sure I won’t, but suddenly I have a strong desire for hot chocolate…

Don’t forget to like on Facebook and follow me on Twitter!

Christmas In July Scarf

I got an early start on Christmas gifts this year!

Just the scarf, not the cat. I used this Lion Brand pattern, which is RIDICULOUSLY simple, but the thick yarn and giant hook gave it an interesting look.

This project on Ravelry

Butterscotch Liqueur

I was inspired to try making this when I unknowingly created an inside joke with a friend’s girlfriend about Harry Potter themed liquor. (Okay, it’s because the story came up where my fiance sent me a photo of Smirnoff Fluffed and Smirnoff Whipped, and in the bad lighting I thought he was sending me a photo of Ravenclaw and Hufflepuff bottles.) We began talking about butterbeer (cream soda and butterscotch liqueur) and I knew I’d found a good Christmas gift! Within a few days of this conversation, I found a pin on Pinterest for homemade butterscotch liqueur, and I realized that making the liqueur would mean I wouldn’t feel obligated to buy a gift as well! I’m a big fan of homemade anyway, and my mother is a homemade limoncello master, so I like to think it’s keeping in family tradition. Or something.

The recipe I used can be found here. It seemed simple – few ingredients, relatively short preparation time (not counting the month of letting it sit in the refrigerator). So after putting the idea off for almost two weeks, I finally got all my ingredients together and started cooking.

Vodka, brandy, sugar, butterscotch flavoring, and vodka & cranberry for me, because why make alcohol and not drink it?


Also, a cat for moral support. Or to get under your feet in the kitchen. Whichever, really.

Do you like my bottle of butterscotch flavoring? I feel like a giant. It’s worth noting that neither Shop Rite or Wegman’s carries butterscotch flavoring, and I wound up going to the local candy store for it. You can order it online as well, which works out if you actually plan ahead, which I did not do. But I highly suggest it.

First, I brought the water and sugar to a boil (well, until the sugar had dissolved – it didn’t quite get to boiling). This took two tries, because I put the pot on the oven, turned on the burner, put in the sugar, and then the water. Turns out, the pot was hot enough that a lot of the sugar was stuck to the bottom, so I dumped it in the sink, washed the pot, and then put the water and sugar in BEFORE putting it back on the oven.

It only took about five minutes for the sugar to completely dissolve. Maybe less, because it took me a bit before I figured out the sugar at the bottom was not sugar, but was in fact bubbles. Ah well, live and learn.

Then I put the sugar water in a mason jar, thinking getting it out of the hot pot would help it cool to room temperature faster. When I started to loose patience waiting, I filled the pot with cool water and let the jar sit in there for a few minutes – magically, it was at room temperature within a few minutes of doing this.

The color of the water is, in fact, yellow-ish brown.

Next I added the vodka, brandy, and butterscotch – I know the recipe calls for 100 proof vodka and Smirnoff is only 80 proof, but I’ve spent so much money on gifts in the past week that I wasn’t about to buy more vodka for something minor like that. The brandy was whatever my fiance had laying around. Also, I was a bit heavy on the butterscotch flavoring…I probably wound up 3/4 tsp instead of the called for 1/2 tsp. But really, what else am I going to do with that little amount of butterscotch? (I do still have some left over.)

Looks like super delicious apple cider vinegar!

Next part is the waiting 30 days part, remembering to shake the jar daily. I set an alarm in my phone for the same time every day to remind me to do it. I let the jar sit on the cement floor of the basement, just so it stays sort-of cool.

Guarded by the ever-vigilant Jack Sparrow

FINALLY a month passed and I cracked that baby open. It smelled pretty strong, and not nearly as butterscotch-y as I expected it would. I mixed it with cream soda and it was delicious!

We also drank a lot of Starbucks peppermint mocha shots to bottle the butterbeer.

I think this is something I would definitely do again. I mean, what else am I going to do with that tiny bottle of butterscotch anyway?

Christmas Gifts 2011

In Order:
Cat Toys
Amigurumi Snowman
Baby Picture Bookmarks
Cross Stitch Votive Holder
Sweater Sleeve Bottle Cover
Infused Olive Oil
Gift Card Holders

Not Pictured
Baby Sherlock Hat
Baby Booties
Ritz Carlton Brown Sugar Scrub

I don’t have enough photos or time to properly describe each project, but if you have any questions leave a comment and I’d be happy to explain anything!

Mod Podge Coasters & Wine Charms

A good friend of mine loves traveling; in fact, there was a time about two years ago where she was out of the country (in various other countries too, not just one) more than she was in it. She also has a November birthday, and since I am the worst her birthday gifts always inevitably become birthday/Christmas gifts, and this year was no exception. I decided to document her many travels using Mod Podge, a roll of cork, and some photos, and make coasters for her.

First I decided what I’d want to put on the coasters – I chose a few of her own photos, as well as a map of each of the places. I had everything printed at Target (including the maps…I just saved images and had them printed as a 4 x 6″ photo – no use in spending money on a map that is ultimately going to get destroyed). I think a 4 x 6″ photo is something like $.27, and I got a few printed for other purposes, so let’s say it was about $2. Then, I was GOING to get Mod Podge, but Pinterest inspired me to just combine equal parts of water and craft glue in a jar, shake it, and VOILA, Mod Podge that cost the price of craft glue and a mason jar…let’s say $5 total for those. I forget how much the cork was, so I’ll say $7 for argument’s sake. I got it at Michael’s, and the roll had WAY more than I needed for these coasters, so now I have cork for…something else.

First, I found something that was the size and shape I wanted the coasters to be (for me, a little dessert bowl), traced them on the cork, and cut them out with regular scissors. I learned after the few two I cut out to make lots of smaller cuts because thin cork rips very easily – I had to go back and clean up some edges. So, I wound up with nine circles…nine CURLY circles

Well, that just won’t do, so I did what anyone would do – I asked my mom how to fix it. Her suggestion of wetting the cork and pressing them under something heavy worked well with my copy of The Original Illustrated Sherlock Holmes, so I wet the rest and pressed them between a VCR (yes, a real VCR) and and XBOX.

The Xbox sounds like a jet plane. I've used it more as a cork press in this process than as a video game console.

After waiting a day, they were totally flat! (I was going to take a photo of the flat cork, but I forgot…I’m going to assume you can imagine what flat cork looks like.)

For the first group of coasters, I cut out the photo to match the shape/size of the cork and then glued it on. Inevitably they weren’t EXACTLY the same, so for the second group I glued on the full size photos and cut out the shapes after they were dry. This just worked out easier for me – I don’t think there’s a right or wrong way. But regardless of when I cut it, I brushed a coat of my ghetto mod podge (GMP) on the cork, and pressed the photo on. I left it for about a day to make sure it was fully dry, then brushed another coat on top of the photo and on the sides (but depending on how to make them, this would be the time to cut the photos to the shape of the cork base) (cork bits were falling off everywhere, so I thought it might help that). I left it for another day or two to dry completely.

After the first coat of GMP, I highly suggest using a fine sandpaper and sand the top slightly (I used 150). I noticed the glue had picked up a lot of dust and other particles from sitting around, so I wanted to make it smooth for the second coat. I sanded it until it was satisfactorily smooth, wiped of any sandpaper-related dust with my shirt (because I’m a professional) and applied the second coat, and left it to dry for another day or so. When that layer was dry, I sanded them again and called it done. I kept them pressed under the Xbox again until I saw said friend, who at least claims to like them which is good enough for me.

If I had to redo anything about this, I wouldn’t have used the cork on a roll. You can get thicker cork, or some other material that won’t be so prone to being curly. They still had a bit of a curl to them when I gave them to the recipient, but we justified them by saying that there was going to be glasses on them anyway so it didn’t really matter. Also this was my first time decoupaging; the next time I use it I think I’ll look up some sort of tutorial to make sure I’m doing it the right way, not the me-way.

 
To go along with this kind-of drinking related gift, I also made wine charms for said friend – it was so easy! I ordered these 25mm hoop earrings and these antiqued wine-related charms from Fire Mountain Gems (because I couldn’t find anything comparable at my craft store). But I DID find silver filler beads (Bead Landing Spacer Beads) and multicolored glass beads (Jewelry Essentials Glass Seed Beads) at Michaels, so I purchased those in person. Then I just strung on a silver bead, a color, a charm, a matching color, and another silver bead, and WHAM instant wine charms. And I still have over 40 more hoop earrings…there are a lot of wine charms in my future.